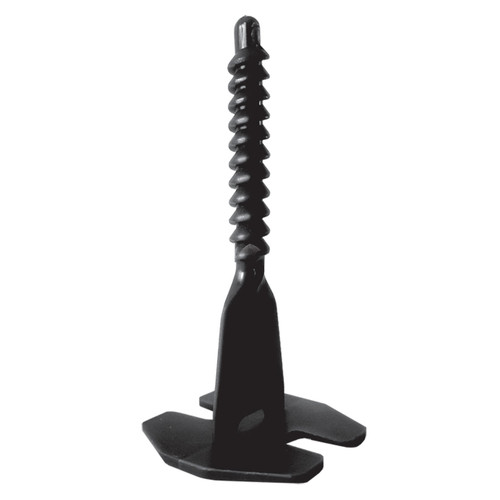
Mapei MapeLevel ProWDG 2mm Spacers C - 3mm to 12mm - 250 Pack
Mapei MapeLevel ProWDG 2mm Spacers C - 3mm to 12mm - 250 Pack
MapeLevel ProWDG System is a tile levelling system for ceramic and stone material of various thickness and size, it can be used on floors and walls, particularly suitable for laying large formats
Wedge levelling system for ceramic tiles and stone slabs on floors and on walls
Pack Content:-
- 250 No. - Mapei MapeLevel ProWDG Spacers C - 2mm - 3mm to 12mm - BLACK
N.B. - Mapei MapeLevel ProWDG Spacers and Wedges sold sold separately - Click here for Options
Where to Use
MapeLevel ProWDG System is a tile levelling system for ceramic and stone material of various thickness and size, it can be used on floors and walls, particularly suitable for laying large formats.
MapeLevel ProWDG System has been developed to help the installer during laying of the tiles, especially when laying large-format tiles or in case of uneven coverings on deteriorated substrates. The system allows to obtain joints with a uniform width and perfectly flat floors, avoiding the formation of lippage between adjacent tiles.
Technical Characteristics
MapeLevel ProWDG System is a levelling systems composed of:
- MapeLevel ProWDG, polypropylene levelling wedges
- MapeLevel ProWDG Spacer C, removable HDPE spacer clips for ceramic tiles and stone slabs with thickness from 3 to 12 mm
- MapeLevel ProWDG Spacer C-H, removable HDPE spacer clips for ceramic tiles and stone slabs with thickness from 12 to 20 mm
MapeLevel ProWDG Spacer C is available in 7 different thicknesses (0.5, 1, 1.5, 2, 3, 4, 5 mm), each one identified by a different colour, for joints from 0.5 to 5 mm wide; while MapeLevel ProWDG Spacer C-H is available in 4 different thicknesses (1, 2, 3, 5 mm), for joints from 1 to 5 mm wide. The spacer clips are designed to break off below the surface of the ceramic tile, for a quick and safe removal.
Thanks to the knurling of the wedge surface, MapeLevel ProWDG perfectly adheres to the spacer clips based on the pressure strenght and levels the tiles accordingly. Moreover, on the wedge surface there is a central rib that perfectly directs the wedge itself into the spacer base.
Quick and easy to apply, these two simple
Advantages
MapeLevel ProWDG System is a complete system available in different sizes for ceramic floors and walls up to 20 mm thick.
- To allow the wedge to be inserted into the spacer clip, the system includes traditional pliers MapeLevel EasyWDG Pushing-Pliers.
- Removing MapeLevel ProWDG Spacer C or MapeLevel ProWDG Spacer C-H is extremely simple and fast.
- The wedge is easily separated from the disposable clips and can be re-used.
- MapeLevel ProWDG System is made of recycled plastic material.
- The MapeLevel ProWDG wedge has a reinforced structure, which makes it more durable and reusable several times, thus avoiding unnecessary waste of plastic material, respecting the environment, and making it more eco-friendly.
- The tip of MapeLevel ProWDG is larger, which makes the application easier.
- The lower back part of the wedge has two extensions, which increase its levelling surface in contact with the tiles and protect the tiles from scratches that could be caused by the pliers.
Application Procedure
Before using MapeLevel ProWDG System, check if the system is suitable with the chosen tile and stone finish
Make sure the tile surface is perfectly clean and free from residues of tile adhesive or abrasives materials before applying MapeLevel ProWDG.
Set Spacers
Spread the adhesive and insert the spacer MapeLevel ProWDG Spacer C or MapeLevel ProWDG Spacer CH underneath the tiles. According to the tile size, apply one or more spacers on each side of the tile. Then lay adjacent tiles.
Insert the Wedge
Insert MapeLevel ProWDG into the spacer clip (in the direction of the already laid tile) and press with MapeLevel EasyWDG Pushing-Pliers until obtaining the desired tile level. Remove any fresh tile adhesive from around clips to prevent dried/cured adhesive from potentially chipping or scratching the tile surface when removing clips later.
Removal
Once the adhesive is set, remove MapeLevel ProWDG Spacer C or MapeLevel ProWDG Spacer C-H by tapping the spacer clips with a rubber mallet or feet, in the same direction as the grout joint. For quick and easy removal, spacer clips are designed to break off below the surface of the tile. The wedge is easily separated from the disposable clips and can be re-used.


